Google Earth Contours vs LiDAR Contours
In this article you will learn how to extract contours from Google Earth and from Equator. Then, we will see how they compare to each other.
To follow along you will need to use: Google Earth Pro, QGIS and Equator.

Video:
Watch the video tutorial below, or follow along with the written tutorial.
Step 1: Generate Contours in Google Earth Pro
In Google Earth Pro, once you’ve found a location that you want to create contours, select the ‘Polyline’ tool.

By scribbling the Polyline tool all over the area, it will generate thousands of points that you can use to generate the contours. Once you’re done, choose a name for your new path and click OK.

Then, right click the path you just created in the list on the left and select ‘Save Place As’. Save it as a KMZ file on your computer.

Step 2: Using GPS Visualizer
Next we are going to assign elevations to the path we create in step 1. Go to www.gpsvisualizer.com and select Convert to GPX.

There are 2 things you need to do on the next screen before clicking Convert. First, upload your file (shown below in red). Then, change the ‘Add DEM elevation data’ dropdown to ‘best available sources’ (shown below in red).

On the next page, you can click the download link (shown below) to download the .gpx file.

Step 3: Creating contours from points in QGIS
In QGIS, add a vector layer. To do this, in the top menu select Layer > Add Layer > Add Vector Layer (shown below).

In the next window, click the 3 dots (shown below in red) and locate your .gpx file. Then click Add at the bottom.

If an additional window pops up, select the layer with the highest number of features. Then click OK.

The points will appear behind the dialog. Click Close to see them.

To turn the points into contours, select Vector from the top menu, and select Contour (shown below). Please note, if you don’t see Contours in this menu, you will need to install the QGIS plugin called ‘Contour plugin’. Once installed, the option will appear in the Vectors menu

Next, update the Data value, Method, Interval and Number (shown below in red). For this example we are going to use a 0.5 meter interval. Then click Add at the bottom.

On the left under Layers, right click the layer. Then, go to Export > Save Feature As (shown below).

Before saving, click the three dots (shown below in red) and select a location on your computer to save the file to. Also, be sure to save in the format of ESRI Shapefile. Then click OK at the bottom.

Step 4: Creating contours from LiDAR using Equator
We are going to generate contours in Equator and see how they compare to the contours generated from Google Earth. First, open Equator and navigate to the exact same location you got your contours from in Google Earth. Once you’re there, click New Site in the bottom left (shown below in red) to declare the site you’d like to generate contours from.

Position the site frame around the area you want to generate contours. Once it’s in place, click Okay (shown below in red).

In the Data menu that opens on the left, select Contours from the elevation products.

Before clicking Generate, be sure to set the Output contour interval to 0.5m (shown below in red). This way, we will be able to compare the contours to the ones generated in Google Earth. Once the Output contour interval is set to 0.5 meters, click Generate.

After a few moments, the contours will load into the map.

The next thing we need to do is import the contours we generated in Google Earth and compare them to the Equator contours. To do this, highlight all the associated files. This includes the .cpg, .dbf, .prj, .shp and .shx files. Once they’re highlighted, drag them all into Equator together and drop them on the map.

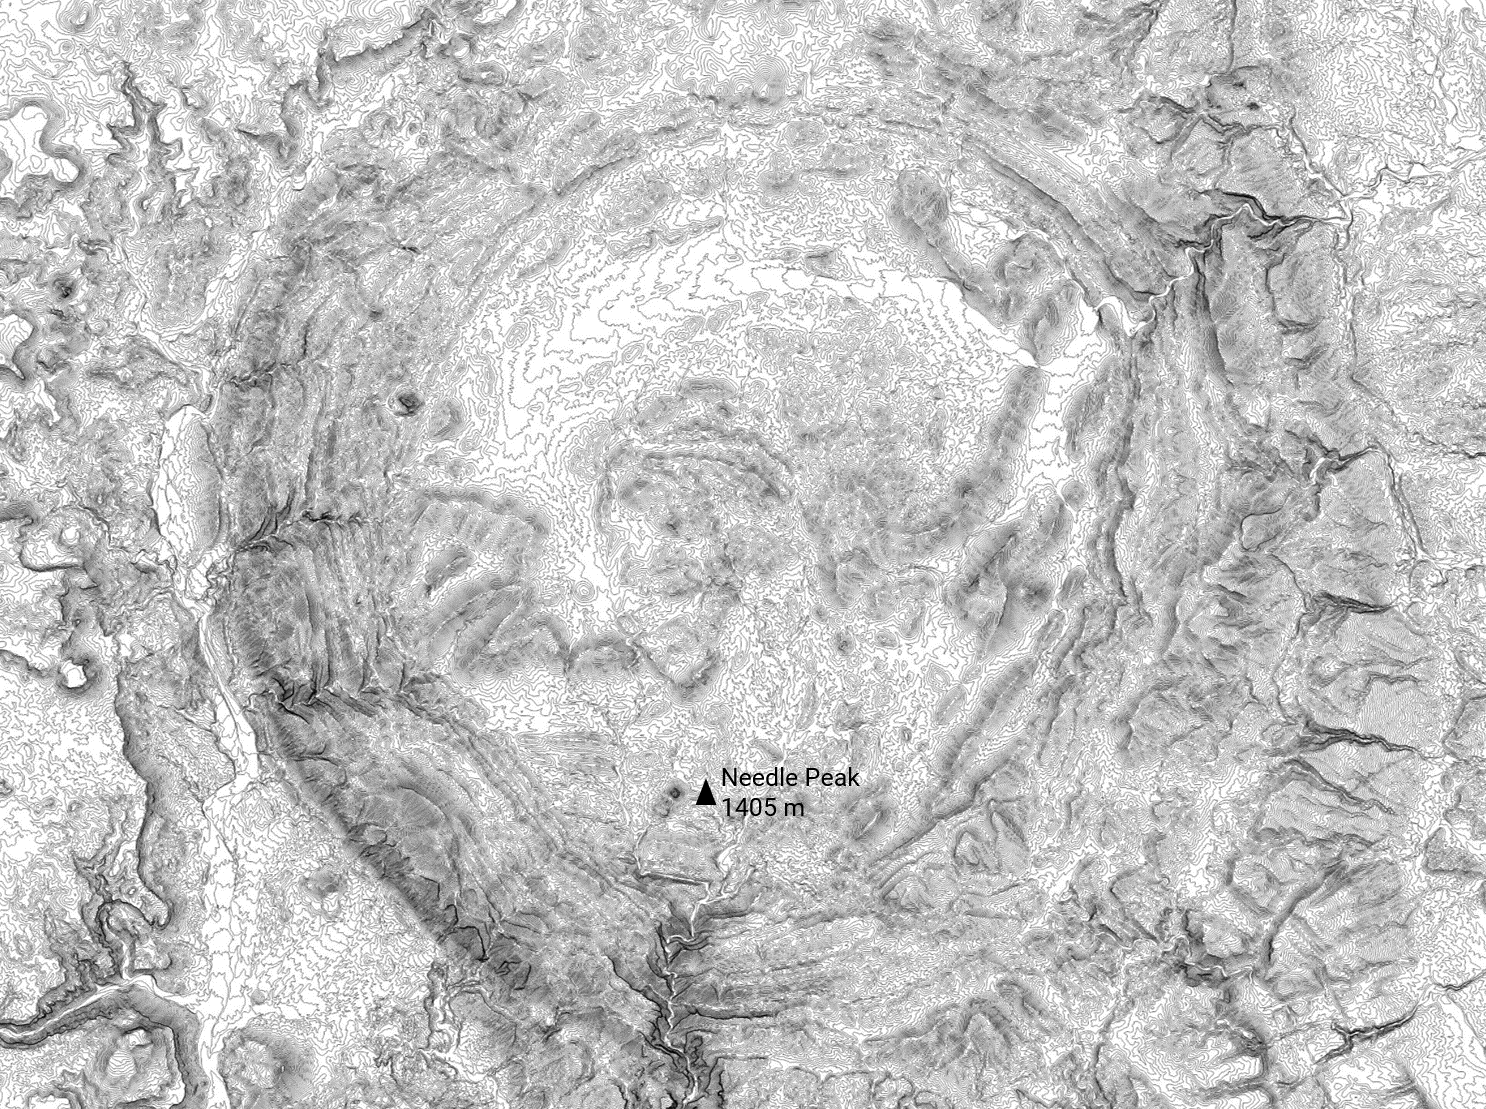
As you can see, the contours from Equator (in white) have far more detail than the contours made in Google Earth (in blue).

The reason for this is because Equator generates the contours from 350,000 LiDAR points whereas the Google Earth contours had around 3000 points. Below you can see the LiDAR survey points used to generate the contours in Equator.

Congratulations! You have exported contours using Google Earth Pro and Equator!